How Can We Help?
Way Alignment Procedure
This document will outline the alignment of the ways on PowderMate presses. Should you find your ways out of alignment follow this procedure.
- Remove way wipers from gibs.
- Unscrew all jacking screws and pull ways back.
- Cover ways with grease (if not equipped with Auto Lube).
- Move upper ram so it is about mid stroke.
- Mic upper platen to die table, bolster plate or press saddle.
- If the four corners are not within .004”:
- Make sure die table is parallel to bolster
- Shim upper ram to make parallel to within .004”
- If the four corners are not within .004”:
- Position upper platen so that gibs are in middle of ways.
- Make sure platen is square with front of press.
- Push the ways by hand up against the gibs.
- Check gaps between way and way backups.
- They should all be about the same distance apart between each other.
- The gap from top to bottom of each way should be the same.
- Jack all ways in until they are .001” away from top and bottom of gibs.
- Only jack the top and bottom jacking screws for each way.
- Use top and bottom pull back bolts to keep ways up tight against jacking screws.
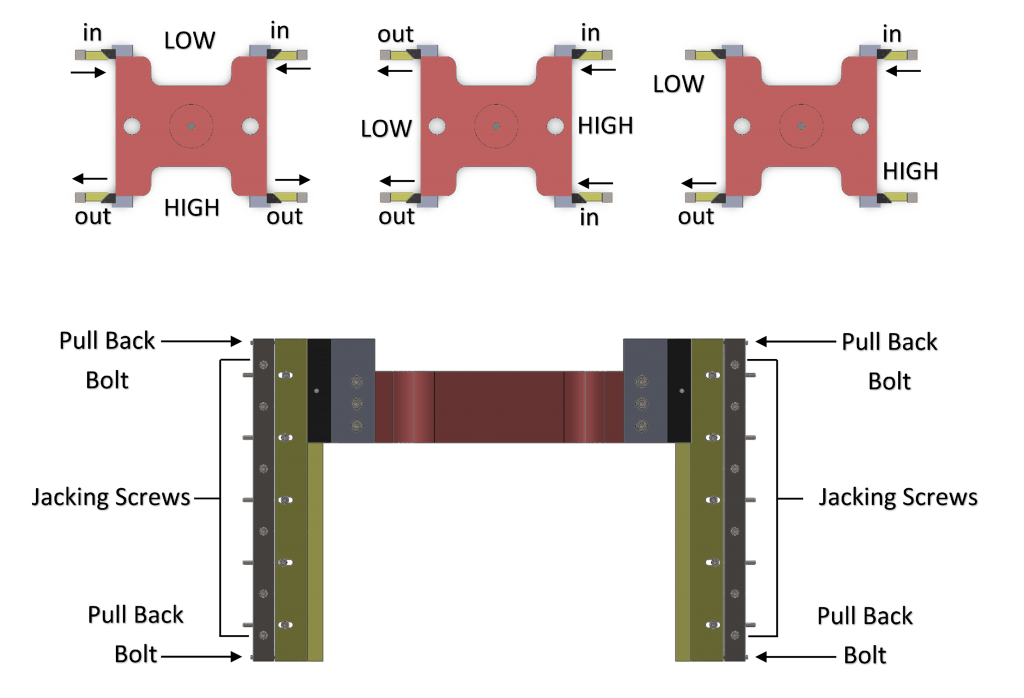
- See picture below for methodology of truing up the platen with the ways.
- Mic upper platen and adjust ways using the above method to make platen parallel.
- Move upper platen down until it is about one inch from fully extended.
- Mic upper platen and adjust ways to make platen parallel.
- Use only the bottom jacking screws.
- Start with the “out” side and loosen the bottom pulling bolt.
- Then turn in the bottom jacking bolt on the “out” side.
- Do not turn the jacking bolt more than 1/8 of a turn at a time
- Make only very small adjustments so as not to over adjust.
- Move upper platen up until it is about one inch from fully retracted to its up position.
- Mic upper platen and adjust ways to make platen parallel.
- Use only the top jacking screws.
- Start with the “out” side and loosen the top pulling bolt.
- Then turn in the top jacking bolt on the “in” side.
- Do not turn the jacking bolt more than 1/8 of a turn at a time.
- Make only very small adjustments so as not to over adjust.
- Check parallelism in up and down positions.
- When upper platen tracks parallel, tighten way slotted bolts.
- Move center jacking bolts up against way and tighten up locking nuts.
- Mounting of upper mounting plate and guide pins:
- Bring the upper ram down as far as you can without bottoming out at the end of the stroke yet far enough away to get a wrench on the mounting bolts.
- Carefully snug up the four mounting bolts to the upper platen tee nuts.
- Mic the upper platen or the upper mounting plate to the die table or bolster plate.
- If the plates are not parallel to within .004”, break loose the four mounting bolts and push the upper mounting plate toward the high side. Tighten up the four mounting bolts again and measure for parallelism. Repeat this procedure until plates are parallel to within .004”.
